L012 - Customizing Garment Styling
Most likely, you will want to customize the styling details of your shape files that you created in Lesson 10. This lesson will show you how to customize styling details such as the bottom rib trim height, the neck trim height, the shoulder slope, the sleeve cap width, etc.
Open DAK & Your Shape File
1. Open DAK. Pressing the F5 key will get you to the Standard Garment Styling mode. Or you can left click on Mode at the top & then Standard Garment Styling. Or you can click on the Standard Garment Styling button as shown below.

2. When you get to the Standard Garment Styling mode, you will see a window like this.
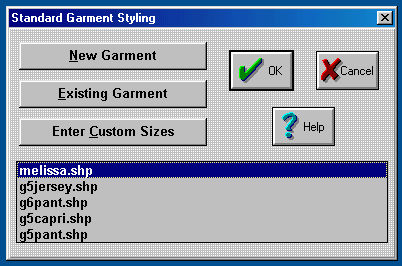
This window is asking if you want to create a new garment, use an existing garment or enter custom sizes. We want to open an existing garment. See the shape files listed at the bottom. If your shape file is listed, click on it. In the above picture, we have clicked on melissa.shp as this is the shape file we want to open. Then click the OK button.
If you don't see your shape file listed, click on the Existing Garment button. Then locate your shape file & open it.
Help on Standard Garment Styling Tools
Click on the Help button ![]() in the tools section. This will give you a new window listing the tools for Standard Garment Styling. If you click on each tool, you will get a description of what each tool does. Print the list of tools so that you know what each is called for this Lesson.
in the tools section. This will give you a new window listing the tools for Standard Garment Styling. If you click on each tool, you will get a description of what each tool does. Print the list of tools so that you know what each is called for this Lesson.

Tools & Their Functions
To the left in the tools section, you will see some of the same buttons that are in the Stitch Designer Mode. They have the same functions. These are the top buttons that take you to the different modes in DAK. Click on the Stitch Designer Mode button. Now you are in the Stitch Designer Mode. Click on the Standard Garment Styling button. Now you are back to the Standard Garment Styling mode, and your shape file is still open.
The Help & Undo buttons are the same as in Stitch Designer Mode.
![]() Garment Type Button
Garment Type Button
Click on this button. This window should look familiar. It's the same window that got you started with creating the shape files in Lesson 10. This window will let you change the type of garment. Click on Vest under Garment Type. Click the OK button. See how your shape has turned into the vest. Click the Undo button ![]() to undo this action.
to undo this action.
![]() Standard Sizes & Custom Sizes Buttons
Standard Sizes & Custom Sizes Buttons
Click on the left button which is the Select Measurements From Standard Table. This will allow you to change the size of your garment.
![]() Measurements Table Button
Measurements Table Button
Click on this button. This is the same window that you saw in Lesson 10. You can change the measurements & click the OK button if desired.
 Styling Buttons
These are the buttons that we will use throughout this lesson. They allow your to customize the styling details of the shape file.
Customizing the Styling Details
1. The top left button is the Styling for Garment Body. Click on this button. In this window, you can customize the measurements.
Leave a Reply
You must be logged in to post a comment.